Skip to content

Country

How to Get Started with Needlepoint: A Beginner's Guide - HM Nabavian

How to Get Started with Needlepoint: A Beginner's Guide

Needlepoint is a time-honored craft that combines creativity and mindfulness. Whether you're looking to create a piece of art, a decorative pillow, or a gift, needlepoint offers endless possibilities. If you're new to this craft, this guide will walk you through the basics, from choosing your materials to mastering your first stitches.

What is Needlepoint?

Needlepoint is a type of embroidery that uses a stiff, open-weave canvas and a tapestry needle to create decorative patterns and designs. Unlike other forms of embroidery, needlepoint is typically done on a grid, which makes it easier to follow a pattern and create precise designs.

Materials You’ll Need

Before you start your needlepoint project, gather the following materials:

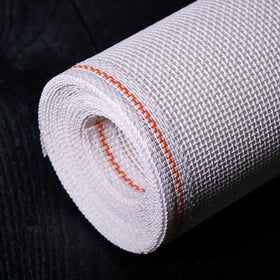
Canvas: Choose a canvas with a mesh count (the number of holes per inch) that suits your project. Beginners may find a lower mesh count (10 to 14) easier to work with.

White 13 ct. - Zweigart (Royal Canvas) Mono Deluxe Canvas - $15.00

 
Thread: Wool, cotton, or silk threads are commonly used in needlepoint. Wool is a popular choice for beginners because it's durable and easy to work with.

Appletons Wool Yarn - Putty Groundings 981 - 989 - $1.75 - $4.75

Waverly Wool Needlepoint Yarn - 7091-7096 - $16.50

Needles: Tapestry needles are ideal for needlepoint. They have a blunt tip that won’t pierce the canvas, and the eye is large enough to accommodate thicker threads.

Tapestry Needles - $2.54

Stretcher Bar: A stretcher bar in the context of needlepoint is a wooden frame used to hold the needlepoint canvas taut while you work on it. This ensures that the canvas remains flat and doesn't warp or become distorted as you stitch, which is important for maintaining the accuracy of the design and the tension of the stitches.

Stretcher Bars - $3.75 - $9.13

Scissors: Use a small, sharp pair of scissors to cut your thread.

KAI 5.5" Embroidery Scissors - $16.99

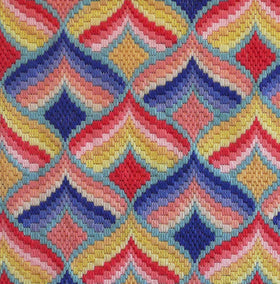
Pattern: Start with a simple pattern. You can purchase one or design your own.

Cherry Blossoms inspired by Van Gogh - Hand Painted Needlepoint Canvas - $75.00 


Setting Up Your Canvas

  1. Prepare Your Canvas: Cut your canvas to size, leaving an extra inch or two around the edges for framing or finishing. If you’re using a frame, attach the canvas to it tightly to keep it from shifting as you work.
  2. Transfer the Pattern: If your canvas doesn’t come pre-printed, you’ll need to transfer your pattern. You can do this by drawing the design directly onto the canvas with a fabric-safe pen or by using a transfer method like tracing.

Basic Stitches

There are many stitches in needlepoint, but as a beginner, you can start with the most basic ones:

  1. Tent Stitch: The tent stitch is the foundation of needlepoint and is perfect for beginners. It’s a diagonal stitch that covers one intersection of the canvas.
  2. Continental Stitch: This is a variation of the tent stitch but with a different technique. It covers more of the back of the canvas and is often used for backgrounds.
  3. Basketweave Stitch: This stitch is worked diagonally across the canvas and creates a smooth finish. It's great for larger areas.

How to Stitch

  1. Thread Your Needle: Cut a length of thread about 18 inches long. Thread your needle and tie a small knot at the end.
  2. Start Stitching: Begin at the back of the canvas. Push the needle up through the first hole and pull the thread through until the knot catches. Follow your pattern, making sure your stitches are even and consistent.
  3. Change Threads: When you run out of thread, secure it at the back of the canvas by weaving it under a few stitches. Cut the excess and start with a new thread.

Finishing Your Project

Once you've completed your design, there are several ways to finish your needlepoint project:

  1. Blocking: This process involves dampening the canvas and stretching it to its original shape.
  2. Framing: You can frame your needlepoint piece as you would a painting.
  3. Pillows and Other Items: Needlepoint designs can be turned into pillows, ornaments, or other decorative items.

Tips for Beginners

  • Start Small: Choose a small, simple project to build your confidence.
  • Take Your Time: Needlepoint is a slow craft, so enjoy the process.
  • Practice Stitches: Before starting your project, practice different stitches on a scrap piece of canvas.
  • Use a Light Source: Good lighting will help you see the canvas holes more clearly.

Why Needlepoint?

Needlepoint is not just a craft; it's a relaxing and rewarding hobby. It allows you to express your creativity, improves your concentration, and provides a sense of accomplishment when you complete a piece. Plus, it's a portable activity—you can take your needlepoint project anywhere!

Whether you're creating a piece of art for your home or a handmade gift for a loved one, needlepoint is a timeless craft that brings beauty and joy. So, gather your materials, choose your pattern, and start stitching your way into the world of needlepoint. 

Embark on Your Needlepoint Journey with Our Starter Kits and Tools at HM Nabavian.

Previous article Rug Repair Techniques: Restoring the Beauty and Longevity of Your Rugs
Next article A Guide to Different Types of Wool for Crafting